In Playwright, We can record videos for each test, for the failed test, and for different test retries.
Table of Contents
- Record video for Each Test
- Stop Recording Video
- Record Video for Failed Test
- Record Video during First Retry
- Specify Video Size during Recording
- Recorded Video Output Directory
- Record Video for Specific Browser Context
- Access Video File at Runtime
- Open Recorded Video
- Video Tutorial
Record video for Each Test
We can record videos for each test by setting the value on for the video option in the playwright configuration file.
const config = {
  use: {
    video: 'on',
  },
};
Another way is you can set the mode value inside the video JSON.
const config = {
  use: {
    video: {
      mode: 'on',
  },
};
With above option, video will be recorded for both failed and passed test scenarios.
Stop Recording Video
By default, the videos are off, or you can set the video option to off in the playwright configuration file. Set mode or video option to off.
const config = {
  use: {
    video: {
      mode: 'on',
  },
};
Record video for Failed Test
In case you want to record video for failed test only. You can set the video or mode option to retain-on-failure in the playwright configuration file.
const config = {
  use: {
    video: 'retain-on-failure',
  },
};
Record Video during First Retry
When you set the video option value to on-first-retry and execute your test using the --retries option video will be recorded for first retry.
const config = {
  use: {
    video: 'on-first-retry',
  },
};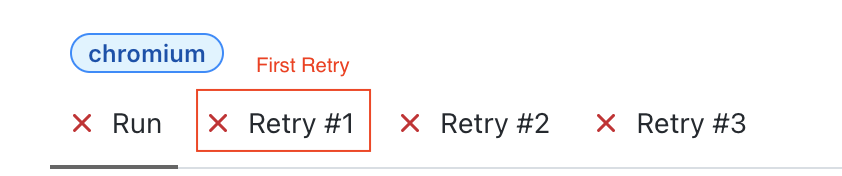
In above example, retries option is set to 3, the video will be recorded for the Retry #1. It will not be recorded for the Run, Retry #2 and Retry #3.
Specify Video Size During Recording
We can also specify the video size in the configuration by giving width and height values in the size option inside video along with the mode option.
const config = {
  use: {
    video: {
      mode: 'on-first-retry',
      size: { width: 640, height: 480 }
    }
  },
};
If the video size is not specified, it will equal the viewport option scaled down to fit into 800x800. If the viewport is not configured explicitly, the video size defaults to 800x450. The actual picture of each page will be scaled down if necessary to fit the specified size.
It is recommended to keep the video size and viewport size value as same for proper view.
Recorded Video Output Directory
Video files will appear in the test output directory, typically test-results. You can change the test output directory by changing the value of the outputDir key in the configuration file. You can also find video in playwright-report/data folder. If you use your own context, you can specify the path in the dir option in context's recordVideo.
Record Video for Specific Browser Context
For the context you have created, you can provide size and dir video recording options using the recordVideo option.
test.only('Test 1', async ({})=>{
    const browser = await chromium.launch({});
    const context = await browser.newContext({
        recordVideo: {
            dir: 'videos/',
            size: { width: 640, height: 480 }
         }
    });
    const page = await context.newPage();
};
if you will not specify dir option video will not be recorded.
Access Video File at Runtime
For multi-page scenarios, you can access the video file associated with the page via the page.video().
const path = await page.video().path();
console.log(path)
Open Recorded Video
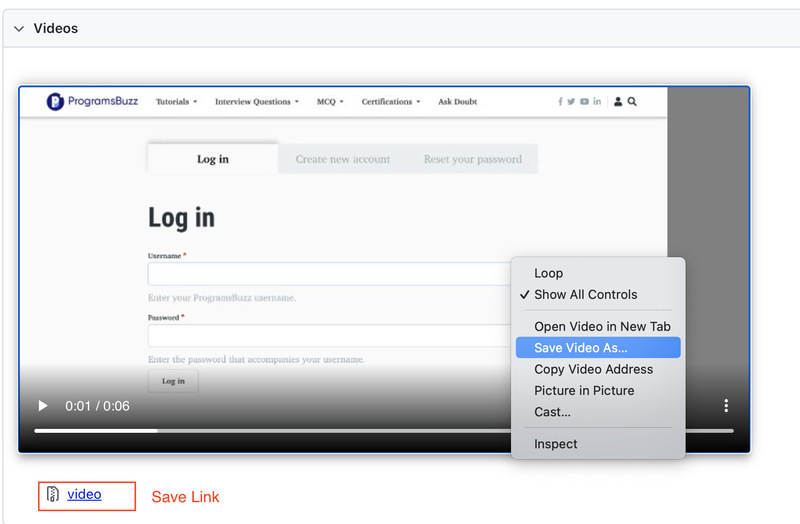
The extension of recorded videos is .webm, which you can open using any browser. Videos are also attached to the report, which you can save using the browser option by right-clicking on the video or the link below it.
- Log in to post comments