You can implement the Cucumber TestNG report using Aventstack Extent Adapter or Plugin by Grasshopper.
In this article, we will attach screenshots for AventStack TestNG Adapter. To generate the report using the AventStack plugin, follow this article.
Cucumber TestNG Extent report Base64 screenshot
Step 1: Add method to capture screenshot in your hook file
public String getBase64Screenshot()
{
    return ((TakesScreenshot) base.getDriver()).getScreenshotAs(OutputType.BASE64);
}
Here,
- TakeScreenshot is an interface that Indicates a driver that can capture a screenshot and store it in different ways.
- base.getDriver() will return my driver instance from base class.
- Using getScreenshotAs we will capture the screenshot with output type Base 64.
Step 2: In after hook call following line
@After
public void af(Scenario scenario)
{
    if(scenario.isFailed())
    {
        ExtentTestManager.getTest().addScreenCaptureFromBase64String(getBase64Screenshot());
    }
}- Receive an instance of Scenario Class in After Hook
- Then call isFailed() method of Scenario class in if condition, to capture screenshot only when scenario fails
- Then use static method with name getTest() of ExtentTestManager Class.
- Then call addScreenCaptureFromBase64String() method of class ExtentTest
Step 3: Execute your scenario using runner class, testng xml or any other way.
Step 4: Open you spark report. Screenshot will be attached with name base64 img
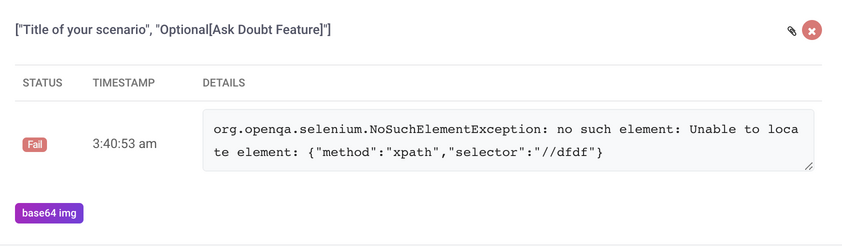
Step 5: Click on base64 img to view screenshot.
- Log in to post comments